Welcome to the IronDiff documentation. Follow the steps below to get your industrial-strength network backup system up and running.
Deployment Overview
IronDiff offers two agent types to fit your environment. Both connect to the same Cloud Portal and provide identical backup, diffing, and encryption capabilities.
Recommended for Linux, macOS, or any host with Docker. Lightweight container deployment with auto-updates via Watchtower.
Prerequisites
- Docker: Installed and running on your host.
- Internet Access: Required for the initial pull and for the auto-updater to fetch security patches.
- Port 5000: Must be available on the host for the web configuration interface.
1. Register & Get License Key
Create a free account at irondiff.com/register. Once registered, navigate to Settings in your dashboard to find your unique License Key.
2. Initial Setup
Create a directory to store your configuration and persistent data:
mkdir irondiff
cd irondiff
3. Launch the Container
Run the IronDiff container. Replace YOUR_LICENSE_KEY with the key obtained in Step 1, and replace America/Denver with your actual local timezone.
docker run -d \
  --name irondiff \
  --restart unless-stopped \
  -p 5000:5000 \
  -v ./config:/app/config \
  -v ./data:/app/data \
  -e TZ=America/Denver \
  -e LICENSE_KEY=YOUR_LICENSE_KEY \
  irondiff/irondiff --daemon
Windows Docker Users: Remove the backslashes (\) and run the entire command on a single line.4. Auto-Updates (Recommended)
To ensure you always have the latest vendor redaction logic and security definitions, we highly recommend running Watchtower alongside IronDiff.
docker run -d \
  --name irondiff-updater \
  --restart unless-stopped \
  -v /var/run/docker.sock:/var/run/docker.sock \
  -e DOCKER_API_VERSION=1.44 \
  containrrr/watchtower \
  --interval 86400 --cleanup \
  irondiff
Ideal for Windows-only sites or RMM-based deployments where Docker isn't available. Native Windows service that installs with a single exe.
Prerequisites
- Windows 10/11 or Windows Server 2016+
- Administrator access for installation
- Internet Access: Required for license validation and uploading backups.
- Port 5000: Used for the local web configuration interface.
1. Register & Get License Key
Create a free account at irondiff.com/register. Once registered, navigate to Settings in your dashboard to find your unique License Key.
2. Download the Installer
Download IronDiffAgent.exe from the Settings page of your IronDiff Portal dashboard.
3. Run the Installer
Double-click the downloaded exe (e.g. IronDiffAgent-1.0.7.exe). Windows SmartScreen will show a warning because the app is not yet code-signed. This is expected and safe to proceed.
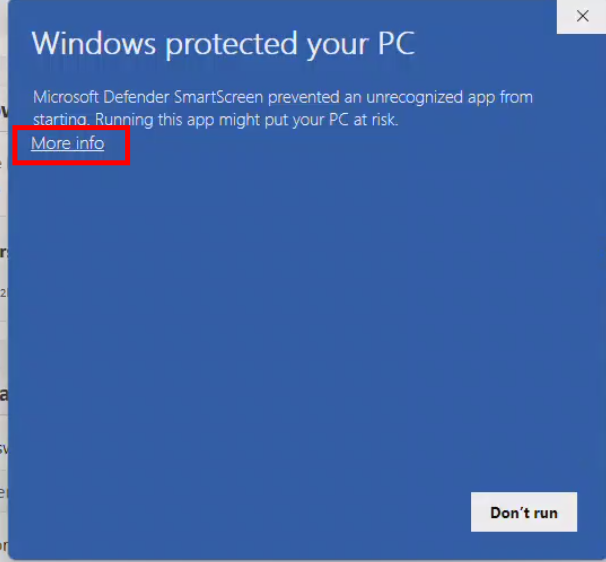
Step A: Click "More info"
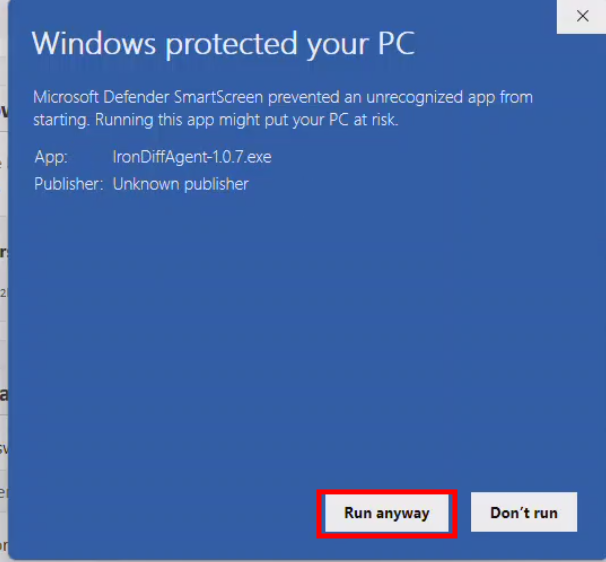
Step B: Click "Run anyway"
The installer will:
- Copy itself to
C:\Program Files\IronDiff\ - Install and start the Windows service
- Open the web UI at
http://localhost:5000 - Show a system tray icon for quick access
4. Scripted / RMM Deployment
For automated deployment via Syncro, ConnectWise, or other RMM tools, pass your license key from Step 1:
.\IronDiffAgent-<version>.exe install --license-key "YOUR-LICENSE-KEY" --site-name "Customer Name" --group-name "Main Office" --silentThis installs the service, writes the license key into the config, and exits immediately. The tray icon still appears for the logged-in user.
5. Auto-Updates
The Windows agent has built-in auto-updates — it checks for new versions every 6 hours and applies them automatically. No Watchtower or manual updates needed.
You can control this behavior in irondiff.yaml:
updates:
  enabled: true               # Set to false to disable auto-updates
  check_interval_hours: 6     # How often to check (minimum 1)
Initial Configuration (Both Agents)
Navigate to your agent’s local web UI in your browser:
- Docker Agent:
https://<host-ip>:5000 - Windows Agent:
http://localhost:5000
SSL Warning (Docker only): The Docker agent automatically generates a self-signed HTTPS certificate to encrypt traffic on your internal LAN. When accessing it for the first time, your browser will flag this certificate. You can safely bypass the warning — your device credentials remain securely behind your firewall and are never routed through our cloud.
Step 1: Security & Licensing
- License Key: Ensure your license key is set (via the
LICENSE_KEYenvironment variable for Docker, or entered during install for Windows). Don’t have it handy? No problem — you can enter it later through the local web UI. - Zero Trust Encryption: Click Generate Key to create your master encryption key. This key is used to encrypt your configurations locally before they are uploaded. CRITICAL: Store this key safely. IronDiff does not have access to this key and cannot recover your full configs without it.
Step 2: Agent Identity & Schedule
- Agent Site & Group: Define your Site Name (e.g., Customer Name) and Group Name (e.g., Branch Office). These identifiers determine how this agent instance appears in your Cloud Portal.
- Backup Schedule:
- Docker Agent: Set your backup frequency using standard Cron Notation. For example,
0 2 * * *will run a backup every day at 2:00 AM. - Windows Agent: Select your backup frequency from the dropdown in the local web UI (e.g. every 30 minutes, every 1 hour, every 2 hours, up to every 24 hours).
- Docker Agent: Set your backup frequency using standard Cron Notation. For example,
Step 3: Device Inventory
Add your network hardware to the inventory by providing:
- Name & Host: A descriptive name (or IP) and the reachable IP address of the device.
- Device Type: Select the appropriate driver for your hardware (e.g., Cisco IOS, Aruba).
- Credentials: Enter the SSH username and password.
- Logical Mapping: Assign a Site Name (usually the Customer) and Group Name (Location or Department) to organize your devices in the portal.
Step 4: Verification
Once a device is added, you can click Run Now to trigger an immediate backup.
- Success: The device will appear in your Cloud Portal dashboard, showing the first configuration version.
- Failure: If a backup fails, the system provides a real-time Log Output showing exactly where the connection or authentication failed.
Supported Devices
IronDiff supports a wide range of networking hardware:
- Cisco: IOS, IOS-XE, ASA
- Aruba: AOS-S, AOS-CX
- Netgear ProSafe: SSH enabled
- MikroTik: RouterOS
- PFSense: XML-based configuration
- Fortinet: FortiGate
- Juniper: JunOS
Enterprise Features
For organizations requiring enterprise-grade security and user management:
- SAML Single Sign-On (SSO): Configure Enterprise Authentication to manage users via your existing IdP.
- Hudu Integration: Automatically sync config diffs to your Hudu documentation platform.
- Syncro Integration: Automatically create Syncro PSA tickets when configurations change or backups fail.
For detailed configuration of specific device types, refer to the Features page.
Next Steps
- View Pricing — See plans and per-device pricing.
- Explore Features — Security, Hudu integration, SAML SSO, and more.
- Start Your Free Trial — 14-day Professional trial, no credit card required.
- Compare IronDiff — See how IronDiff stacks up against Oxidized, RANCID, Unimus, and others.
Ready to deploy IronDiff?
Start with a free 14-day Professional trial — no credit card required.